How to upgrade MySQL & MariaDB on Linux Cloud Servers
MySQL & MariaDB are open-source relational database management systems and are possible to use in most Linux distributions. It uses SQL (Structured Query Language) to manage its data.
This guide outlines the basic steps required to upgrade MySQL and MariaDB on Linux systems.
To upgrade MySQL 5.6 to 5.7 on CentOS 7
Check the current version of MySQL on the server.
# mysql --version
Before initiating the upgrade, take the full backup of all databases that exist on the server with the below command.
# mysqldump -u root -p --all-databases > /tmp/all-database.sql
Enter the root password and then theall-database.sqlwill be created under /tmp directory:
Stop MySQL service with the below command.
# systemctl stop mysqld
Now create the backup of the current MySQL data with the below command.
# cp -r /var/lib/mysql /var/lib/mysql.backup
Download the MySQL RPM which needs to upgrade. Here downloading the MySQL 5.7 RPM to /tmp directory with the below command.
# wget http://repo.mysql.com/mysql57-community-release-el7.rpm -P /tmp/List the /tmp directory on the server to verify whether it downloaded.
# cd /tmp/

# ll | grep mysql
Now need to remove the MySQL-Community RPM that contains the current version of MySQL 5.6.
# yum remove mysql-community-release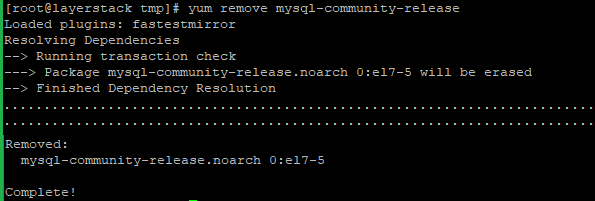
Install the recently downloaded MySQL 5.7 RPM/
# rpm -ivh /tmp/mysql57-community-release-el7.rpm
Update the MySQL repository to the recently installed 5.7.
# yum update mysql
Now restart the MySQL service and check the version with the below commands.
# systemctl restart mysqld

# mysql --version
Here from the last image, you can verify that the MySQL service upgraded from 5.6 to 5.7.
To upgrade MySQL 5.7 to 8.0 on Ubuntu/Debian
Check the current version of the MySQL on the server
# mysql --version
Before initiating the upgrade, take the full backup of all databases that exist on the server with the below command.
# mysqldump -u root -p --all-databases > /tmp/all-database.sqlEnter the root password and then the
all-database.sqlwill be created under /tmp directory:
Stop MySQL service with the below command.
# systemctl stop mysql.service
Now create the backup of the current MySQL data with the below command.
# cp -r /var/lib/mysql /var/lib/mysql.backup
Now download the MySQL APT repository.
# wget https://repo.mysql.com//mysql-apt-config_0.8.14-1_all.deb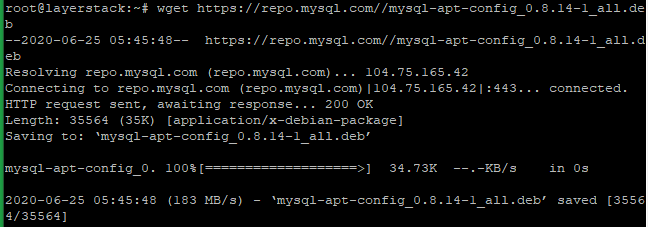
Then add the MySQL APT repository to the server’s software repository list with the below command.
# dpkg -i mysql-apt-config_0.8.14-1_all.debThe below screens will get and select the
MySQL Server & Clusteroption and pressenter.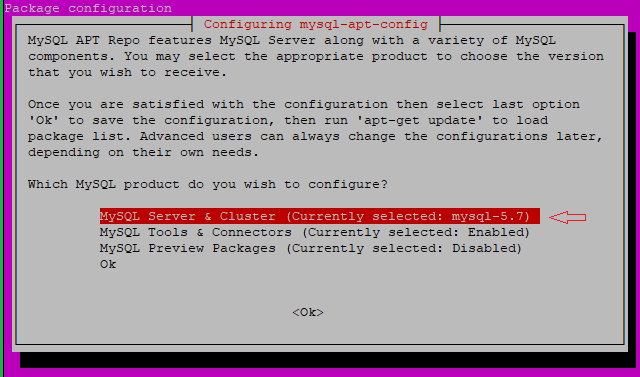
Now select themysql-8.0and pressOK.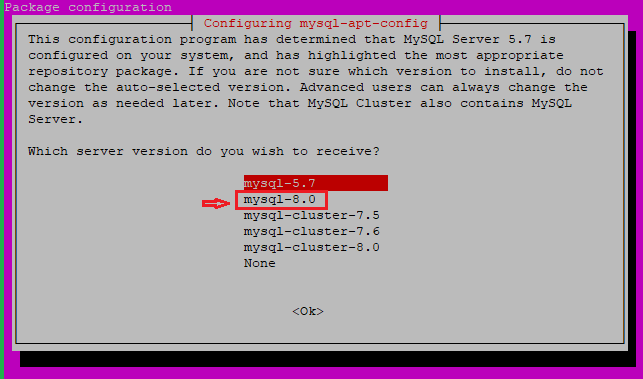
Click on the below-mentioned
OKto finish.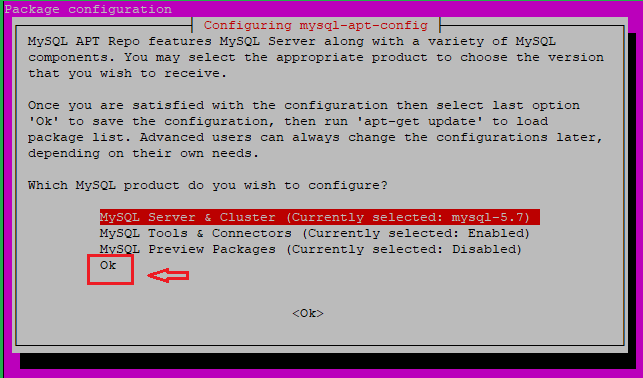
Then will get the below message.

Now update the server and install the latest MySQL using the below commands.
# apt-get update

# apt-get install mysql-server

Now restart the MySQL service and check the version with the below commands.
# systemctl restart mysql.service

# mysql --version
Here from the last image, you can verify that the MySQL service upgraded from 5.7 to 8.0.
To upgrade MariaDB 5.5 to 10.1 on CentOS 7
Check the current version of the MariaDB on the server and Enter the MariaDB root password.
# mysqladmin -u root -p version
Before initiating the upgrade, take the full backup of all databases that exist on the server with the below command.
# mysqldump -u root -p --all-databases > /tmp/all-database.sql
Enter the MariaDB root password and then theall-database.sqlwill be created under /tmp directory.
Stop MariaDB service with the below command.
# systemctl stop mariadb
Now create the backup of the current MariaDB data with the below command.
# cp -r /var/lib/mysql /var/lib/mysql.backup
Now need to add the latest MariaDB 10.1 repo for CentOS 7 distributions. For that add the following text in
/etc/yum.repos.d/MariaDB10.repowith the text editorvi.# MariaDB 10.1 CentOS repository list - created 2016-01-18 09:58 UTC # http://mariadb.org/mariadb/repositories/ [mariadb] name = MariaDB baseurl = http://yum.mariadb.org/10.1/centos7-amd64 gpgkey=https://yum.mariadb.org/RPM-GPG-KEY-MariaDB gpgcheck=1
Now remove the current MariaDB 5.5 from the server with the below command.
# yum remove mariadb-server mariadb mariadb-libs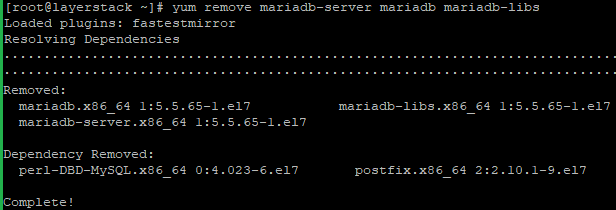
Then remove the repository cache with the below command.
# yum clean all
Now proceed with the Installation MariaDB 10.1.
# yum install MariaDB-server MariaDB-client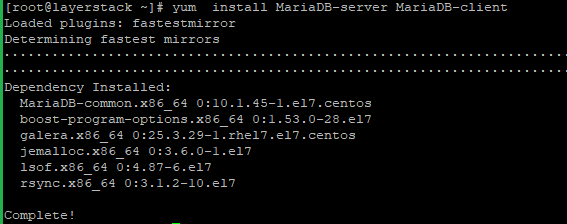
Once the installation is completed, start and enable MariaDB.
# systemctl start mariadb

# systemctl enable mariadb
Now run the below command to check the new version of MariaDB.
# mysqladmin -u root -p version
Enter the MariaDB root password.
Here from the last image, you can verify that the MariaDB server upgraded from 5.5 to 10.1.
To upgrade MariaDB 10.1 to 10.5 on Ubuntu/Debian
Run the below command to check the current version of the MariaDB on the server and Enter the MariaDB root password.
# mysqladmin -u root -p version
Before initiating the upgrade, take the full backup of all databases that exist on the server with the below command.
# mysqldump -u root -p --all-databases > /tmp/all-database.sqlEnter the MariaDB root password and then the
all-database.sqlwill be created under /tmp directory:
Stop MariaDB service with the below command.
# systemctl stop mariadb
Now create the backup of the current MariaDB data with the below command.
# cp -r /var/lib/mysql /var/lib/mysql.backup
Now run the below commands to add the MariaDB PPA on the server.
# apt-get install software-properties-common
# apt-key adv --fetch-keys 'https://mariadb.org/mariadb_release_signing_key.asc'
# add-apt-repository 'deb [arch=amd64,arm64,ppc64el] http://mirrors.supportex.net/mariadb/repo/10.5/ubuntu bionic main'
NOTE: Replace
ubuntubionic with your distribution name and release.Now remove the current MariaDB 10.1 from the server with the below command.
# apt remove mariadb-server
Then remove the repository cache with the below command.
# apt-get clean all
Now proceed with the Installation MariaDB 10.5
# apt-get install mariadb-server
Once the installation is completed, start and enable MariaDB.
# systemctl start mariadb

# systemctl enable mariadb
Now run the below command to check the new version of MariaDB.
# mysqladmin -u root -p version
Enter the MariaDB root password.
Here from the last image, you can verify that the MariaDB server upgraded from 10.1 to 10.5.
