Setting SPF record to prevent spoofing & reduce sender forgery for Cloud Servers
Sender Policy Framework (SPF) is a commonly used email authentication method that helps to prevent spam emails by detecting spoofing. SPF also helps in reducing sender addresses forgery during email delivery by verifying sender IP addresses. In general, SPF specifies which IP address is authorized to send an email for a domain. If an email recipient receives an email from your domain and if the IP address from which the email has been sent is not allowed in the SPF record for the domain, the recipient can reject the message.
If you wish to send out an email from your domain through any mail server or third-party service, you must configure your SPF record to permit delivery from those IP addresses. Otherwise, the email receivers may reject all emails sent from your domain. Apart from the IP address, you can also specify the domain’s MX record, A record and relay server details in SPF record.
Understand more about SPF Record
The SPF record will be a TXT record under the domain’s DNS records and will look like as below:
Type: TXT
Host/Name: testdomain.com
Value: v=spf1 a mx a:secondaryhostname ip4:123.123.123.123 ~all
You may generate the SPF record using SPF generator tools available on the web such as MXToolBox.
SPF involves 3 sections:
- SPF version
- Qualifiers (Prefixes)
- The mechanisms (Rules)
SPF version
An SPF record always begins with a version number, such as v=spf1.
Qualifiers (Prefixes)
Qualifiers designate whether the records pass or fail the lookup tests.
| Qualifier | Result of lookup tests |
|---|---|
| + | Pass (the address passed the test) |
| – | Fail (the address failed the test) |
| ~ | Softfail (the address failed the test, but the result is not definitive) |
| ? | Neutral (the address did not pass or fail the test) |
Mechanism (Rules)
Mechanisms identify the IP addresses authorized to send email from a domain. Can use one or more mechanisms in a single SPF record.
| Mechanism | Result |
|---|---|
| ALL | Match always (all IPs, both local and remote) |
| A | Match if sender IP address is matching with given A record |
| IP4 | Match if matching with specified IPv4 address |
| IP6 | Match if matching with specified IPv6 address |
| MX | Match if matching with given MX record |
| PTR | Match if both forward and reverse DNS records match |
| EXISTS | Match if the specified domain exists |
| INCLUDE | Include some other domains policy (Usually used in case, external domains used by local mail senders) |
SPF Record Examples
Here are some examples of SPF records:
| Example | Result |
|---|---|
| "v=spf1 -all” | Specifies no addresses pass the test |
| "v=spf1 +all" | Specifies all addresses pass the test |
| "v=spf1 a -all" | Specifies addresses listed in the DNS A record pass the test |
| "v=spf1 a mx -all" | Specifies addresses listed in the DNS A record and MX A record pass the test |
| "v=spf1 a mx ptr -all" | Specifies addresses listed in the DNS, MX and PTR A records pass the test |
| "v=spf1 ip4:123.123.123.123 -all" | Specifies a single IP address |
| "v=spf1 ip4:123.123.123.0/24 -all" | A range of IP addresses pass the test |
| “v=spf1 include:examplelayerstack.com -all” | Include other domains SPF rules |
| “v=spf1 mx mx:external.examplelayerstack.com -all” | Using external mail server |
Sample for creating SPF record from Plesk Panel
When a domain is created in Plesk Panel, the email services are enabled by default for the domain and a default SPF record will be added in the DNS zone as a TXT record.
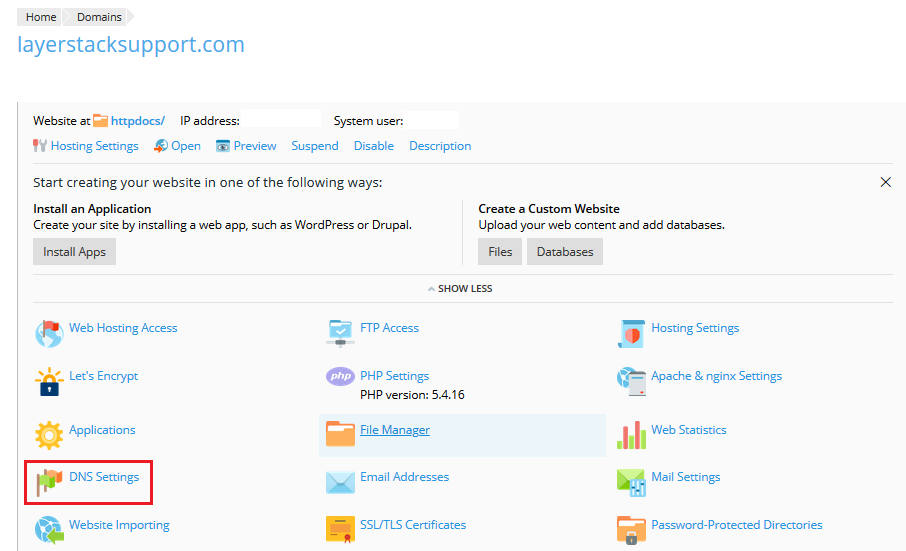
To check on the default SPF record, please follow the below steps:
Click
DNS Settingsoption from under your domain in Plesk Panel.
2. The SPF record can be seen added as a TXT record by default.

Example for SPF record (Plesk default): v=spf1 +a +mx +a:layerstacksupport.com -all
This denotes that the mail from the domain layerstacksupport.com is authorized to be sent out by the A record of the domain (+a), MX record of the domain (+mx) and the A record of the server hostname (+a:layerstacksupport.com). The qualifier (-all) indicates that all emails that are sent out from IP address/MX address other than the values specified in the record, will fail.
Manually add the required SPF record for your domain from Plesk Panel
1. Generate the SPF record by making use of any SPF generator wizard, such as MXToolBox.
Example for SPF record (Custom): v=spf1 a mx ip4:123.123.123.123 -all
This denotes that the mail from a domain is authorized to be sent out by the A record of the domain (a), MX record of the domain (mx), and the A record of the server hostname 123.123.123.123. The qualifier (-all) indicates a strict fail and means that all emails sent out from IP address/MX address other than the values specified in the record, will fail.
2. Click DNS Settings option for your domain from Plesk and then click Add Record button.

3. Set the records as below:
Record type: Select TXT from the drop-down menu.
Domain name: You can leave this field blank for setting up the SPF record for your domain.
TXT record: In this field, you need to enter the SPF record that you have generated.

4. Once everything is confirmed, click OK.
5. Click the Update button for the newly added TXT record to be updated in the DNS zone for the domain.

NOTE : If the DNS record for your domain is handled by external DNS service providers (E.g.
Domain Registrars), then, the SPF record generated and added in the Plesk panel needs to be added in the DNS zone at thatDNS service providerend /nameserverend.
